|
E-Mailing Pictures for Beginners
A Few Simple Steps Ensure Success When You Send Your Favorite
Photos Over The Internet
E-mailing photographs
can be broken into two basic steps: attaching the image file and knowing what
type of file to attach. The first part is easy – once you’ve taken
care of the second part. So, for e-mail beginners, we’ll start with
easy stuff.
Practically every e-mail program utilizes the “Attach” feature. If you can’t find the icon right on the screen (it’s usually represented as a paper clip), you will find the feature listed below the File or Edit menu. More often than not, it’s simply a matter of clicking “Attach” or “Insert” and then double-clicking on the file you’d like to send .
Sometimes you can even drag and drop the file right on to the e-mail – although the software may interpret this to mean you’d like the image to appear in the body of the message. This may work, but to be on the safe side, always attach a file to an e-mail rather than incorporating the photo into the body copy. That might lead to the recipient opening the message to find a very long list of garbled text, rather than a photograph. When you attach a
file, the file that you have on your desktop is the same file that will be
seen by the recipient. If it’s an RGB color, 300 dpi, 300 by 500 pixel
JPEG file that you attach – that will arrive at the other end.
But that doesn’t mean you can (or should) attach any old file to your e-mail.
This is when understanding exactly what types of files to send becomes important.
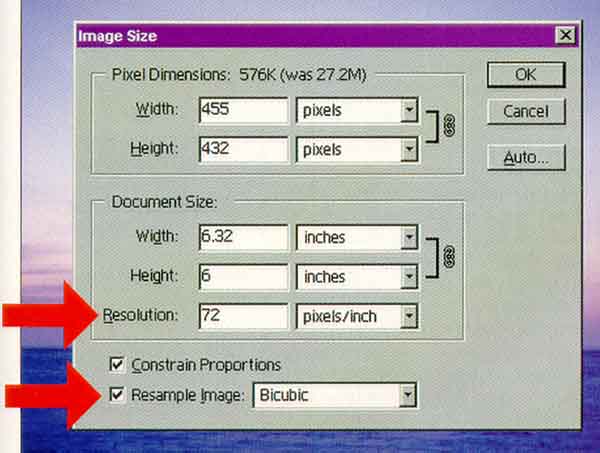
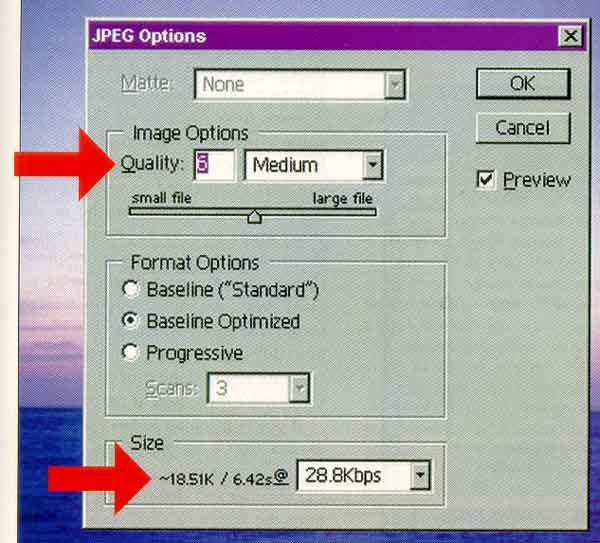
ABOVE: If the Image is only going to be displayed on a computer monitor, you don’t need to have it at 300 dpi resolution. Do a quick Save As and change the resolution to 72 dpi (monitor resolution). Be sure you’ve checked the Resample box and, again be sure you’re doing this as Save As (under File) BELOW: Saving your images as JPEGs is important to avoid overloading e-mail Internet servers. Unless someone has specifically said to send a large TIFF file, it’s a good idea to send a JPEG. Even a medium-quality JPEG will be good enough for most applications – you can see how much easier and faster the download will be at the other end.
Files for Sending Image files are inherently
large – much larger than a typical text file – so you’ve got to take care
to optimize them for travel across the Net. If you try to send an image that’s too large, it may never arrive. It’s also important to send a file that is universally accepted in many different programs and on both Mac and Windows machines, like JPEG or TIFF. While those files are equally universal, only one of them is ideal for e-mailing. That’s the JPEG. A JPEG is a compressed file. This means that the file takes up much less space on your hard drive or floppy disk than an uncompressed file (such as a TIFF). Compressing files often will result in a slightly degraded image, but usually this trade-off is well worth it. And since the compressed file is much smaller, it’s ideal for transmission through e-mail. To help you manage the loss in image quality, many programs let you view downloading information when you’re saving an image as a JPEG. For example, in Photoshop’s JPEG Save As dialogue box, there’s a “Quality” slider that allows you to adjust the compression from 1 (low quality – high compression) to 12 (high quality – low compression), depending upon your needs. As you move the slider, you will see other pertinent information changes, including the file size (hopefully it is well under 300 kilobytes) and download time with various connections. You then can adjust the download time to meet your needs – say under 15 seconds for a 28.8 Kbps (kilobits per second) dialup modem. Some e-mail services (like AOL) are notorious for making it hard to e-mail image files. These services often put strict limitations on the maximum allowable file size. When the service isn’t the culprit, some users have set their e-mail programs to a maximum allowable file size. Perhaps they’ve been burned before by an oversized image that should never have been sent, and now they’ve restricted incoming files to be small. So if you don’t know how to optimize an image for e-mail, you just may be out of luck. Which leads us to the most variable part of this whole process: the human element. Whenever possible, contact the recipient ahead of time make sure he or she is ready, willing and able to receive photo files. At the very least, dash off an e-mail (without any attachments) to simply say, “I’ll be sending you an image file attached to the next e-mail. If you don’t receive it please let me know.” That way if the message gets lost on the Net, you’ll know about it. And if your recipient is computer-savvy, the two of you can discuss exactly what the images will be and how they will be optimized. After all, they probably know the limitations of their e-mail provider, as well as what they ultimately plan to do with the image. This is the first question you should ask yourself before e-mailing an image file: What’s the intended use? You can probably answer this question in one of two ways: I’m sending this image to viewed on the screen, or I’m sending this image file to be printed on paper. This distinction is very important, and will affect everything you do to get the image ready to go across the Internet. If you’re passing along a photo you think your friend may just like to see, send him or her an image file that hat has optimized for on-screen viewing. That means a resolution of no more than 72 dots per inch (that’s the most common monitor resolution) at the physical size you’d like the photo to appear on the screen. This size is not measured in inches, but in pixels. If you target for a typical 17-inch monitor, it will usually have 1024 by 768 pixels displayed. Therefore a photo measuring 800 by 600 pixels will easily be displayed on a typical monitor. However, if your recipient has a smaller or larger monitor you can adjust the size of the image you send accordingly. Typically a 15-inch monitor is set to 800 by 600 pixels, we discussed a 17-inch monitor above, and a 19-inch monitor is usually set to 1280 by 960 pixels. Adjusting the pixel size of an image is probably the most difficult part of adjusting e-mail images. If you plan to have the image printed after e-mailing, things get a bit trickier. You may be better off using a CD burner and burn a cheap CD-R disk and send it by snail mail. If you must e-mail the image and it’s going to be printed, it helps to know the specifics about the recipient. If you are both using a high-speed broadband connection to the Net, large file sizes are not a limiting factor. In fact, files over 50 megabytes can then be considered. The last thing you want is a friend, or perhaps worse, a client staring at a glacially moving status bar as your oversized file occupies his or her computer for hours. (A dialup modem may require an hour to download a 10 megabyte file.) If you plan to send multiple high-resolution files to the same person, first of all, send the images one at a time. Also, consider investing in special third-party compression software. These programs include Lizard Tech’s Genuine Fractals and Algo Vision LuraTech’s Genuine LuraWave. These programs offer even more compression without loss of quality. That means you will be able to send even larger files than normal. The only catch is that you’ve got to make sure that the recipient uses the same programs and will be able to work with files at the other end. As much as physical
requirements and transmission speed, there’s an important psychological aspect
to e-mailing photo files. It can be summed up this way: If you
delay or crash your friend’s/family’s/boss’ computer with an unwieldy file,
you could very quickly find yourself alone on Christmas and without a job.
In which case, you’d have to agree that e-mail doesn’t make life easier.
|